The dish fits over the LNBF arm and bolts to the backbone mount onthe mounting hub which slots into the compact tripod. That is it; the Campersat Portable Compact is ready to go.
There is also a cabling accessory kit to help keep things neat in caravan, motor home or campervan.
 It can all be unbolted fortransport, but the unit is small and light enough for that to be unnecessary unless space is at a premium. A big benefit of reading the Installation and Operation Manual in conjunction with the KOSCom 1600A Digital Satellite Receiver Operation Manual is that 'Techo Speak' is blown out of the water with plain instructions, simple graphics and a portable, laminated onesheet guide to 'Finding the Satellite' and 'Satellite Signal LocationMaps'.
The Receiver connection to the Campersat and the TV is simple. Just plug the color coded jacks into the corresponding colors in the AV Outputs. Plug the Coaxial cable for the Campersat Dish into the 'SatIn' connector on the back of the Receiver. Plug in the 240V power cord and turn the Receiver on at the power switch on the back panel.The only 'Must Do’s' with the Receiver are keep it dry at all costs and don’t block the ventilation holes on top.
And now a few words about patience. On our first attempt at Dish-Pointing we hit the Optus Auroa C1 satellite first shot. This may have had some science, but was more likely beginner’s luck.
 When we shut the system down and moved the dish some distance to fairly uneven ground we were not so smart. Most of the 10 minute set-up time went on fine tuning the dish elevation and Azimuth angle to the satellite. Patience pays.
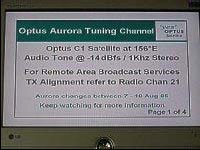
The tripod is well engineered and is easy to adjust and set through lock knobs. A one degree tweak can make a huge difference. So follow the manual. Connect the generous 25m coaxial signal cable to the ‘Sat in’ plug onthe back of the Satellite Receiver. Run the cable to the dish and join the connection to the Test Meter. Set the TV/VCR to AV. Set the Satellite Receiver to Channel 1, the Optus Aurora Tuning Channel. Use the Campersat remote. It comes with two batteries which are fitted during set-up.
Press the Electronic Program Guide button (EPG) on the Campersat remote and the channels come up on the TV screen. Get a clear line of sight to the north. That’s just right of the sun at mid-day. A compass helps, but is not essential. Get the tripod steady and level and stake it down through the holes at the end of the legs.
 Aim for clear sky, no trees, and vehicles, clothes on lines or buildings in the line of fire. Take your time and think logically. You can’t see the C1 satellite, its signals transmit over 36,000 km. So imagine you are looking through a pipe. That is all the clear space you need to hit the C1 satellite. Refer to the laminated 'Satellite Signal LocationMaps' caravan parks and tourist park accommodation directory australia - Go See Australia Directory Page 2 of http://www.goseeaustralia.com.au/ViewEditorial.asp?EdID=90
Set the Low Noise Block Converter and Feed (LNBF). It is on the endof the arm which extends from the Dish. Use the LNBF Polarisationchart to adjust the calibration scale.
 Read off Elevation (Tilt) = In Melbourne 44deg. Sydney is 50 deg. It is a ‘right hand thread’ but, the Campersat elevation marker can be set up for left-handers. Now get the test meter on the back of the dish backbone buzzing by pressing the two yellow buttons on its face simultaneously. You get a visual read out too in red bars. Read off Direction (Azimuth) = InMelbourne 17deg to the right (east) of north. Rotate the Dish to get the maximum signal from the test meter. Lightly lock the Dish and press Channel 1OK on the Campersat remote.